Selfhosting Bluesky with Docker and SWAG

On Feb. 22 2024 Bluesky announced that they are opening up federation and self-hosting. I wanted to wait a bit for the kinks to get ironed out. Being on the other side of this journey I wish I would have waited a bit longer, but that's where this post comes into play. I want to help other setup their own Bluesky servers as easily as possible. Bluesky has an installer, which makes some ...interesting... assumptions, but my goal was to try to setup Bluesky with the program I have and then streamline it for user consumption.
Introduction
First we need to understand what we will be hosting. We will be setting up a Personal Data Server (PDS). The PDS basically stores all your public and private data and also acts as your entryway into the Bluesky network. Here is a more detailed overview of what a PDS is and how it relates to BlueSky's architecture.
The Domain & Server
First and foremost you will need a domain name. I prefer Namecheap.com, but there are other registrars out there as well.
You will also need a server. Most people go with a Digital Ocean or Vultr server. I use a Hetzner auction server. Below are the requirements as stated by Bluesky:
Ensure that you can ssh to your server and have root access.
Server Requirements
- Public IPv4 address
- Public DNS name
- Public inbound internet access permitted on port 80/tcp and 443/tcp
Server Recommendations
| Operating System | Ubuntu 22.04 |
| Memory (RAM) | 1 GB |
| CPU Cores | 1 |
| Storage | 20 GB SSD |
| Architectures | amd64, arm64 |
| Numer of users | 1-20 |
I would also recommend creating a seperate user with access to specific folder for where you will store the PDS data.
Once you have your domain and server, I recommend changing the nameservers over to Cloudflare. This provides protection and better configuration.
After you have transferred your nameservers (and DNS) over to cloudflare, go ahead and setup a couple A records in the DNS.
| Name | IPv4 Address |
|---|---|
| yourdomain.com | [Server IP] |
| bluesky | [Server IP] |
| *.bluesky | [Server IP] |
Docker
After that, SSH into your server because you will need to install docker. This is a pretty straightforward process:
for pkg in docker.io docker-doc docker-compose docker-compose-v2 podman-docker containerd runc; do sudo apt-get remove $pkg; doneThen we setup Docker's apt repo
# Add Docker's official GPG key:
sudo apt-get update
sudo apt-get install ca-certificates curl
sudo install -m 0755 -d /etc/apt/keyrings
sudo curl -fsSL https://download.docker.com/linux/ubuntu/gpg -o /etc/apt/keyrings/docker.asc
sudo chmod a+r /etc/apt/keyrings/docker.asc

# Add the repository to Apt sources:
echo \
  "deb [arch=$(dpkg --print-architecture) signed-by=/etc/apt/keyrings/docker.asc] https://download.docker.com/linux/ubuntu \
  $(. /etc/os-release && echo "$VERSION_CODENAME") stable" | \
  sudo tee /etc/apt/sources.list.d/docker.list > /dev/null
sudo apt-get update
Then finally we install docker
sudo apt-get install docker-ce docker-ce-cli containerd.io docker-buildx-plugin docker-compose-pluginSWAG Container
We will need to setup a bare minimum of 2 containers for this. One being the reverse proxy, the other being the PDS. This section will cover setting up SWAG for a reverse proxy. We will also be using docker compose as I find it easier. Docker compose is just a yml file that is used to tell docker how to create containers.
Create a file named docker-compose.yml where ever you would like. Just remember the location.
---
version: "3"
services:
  swag:
    image: lscr.io/linuxserver/swag
    container_name: swag
    cap_add:
      - NET_ADMIN
    environment:
      - PUID=1000 #id -u
      - PGID=1000 #id -g
      - TZ=Europe/London #change
      - URL=yourdomain.url #your domain
      - SUBDOMAINS=www,bluesky
      - VALIDATION=dns
      - DNSPLUGIN=cloudflare #optional
      - PROPAGATION=20
      - EMAIL=<e-mail> #optional
    volumes:
      - /path/to/appdata/config:/config
    ports:
      - 443:443
      - 80:80 #optional
    restart: unless-stopped
Then we'll fire up the container via docker compose -f <path/to/your/docker-compose.yml> up -d
After the container is started, we'll watch the logs with docker logs swag -f. After some init steps, we'll notice that the container will give an error during validation due to wrong credentials. That's because we didn't enter the correct credentials for the Cloudflare API yet. We can browse to the location /config/dns-conf which is mapped from the host location (according to above settings) /path/to/appdata/config and edit the correct ini file for our dns provider. For Cloudflare, we'll enter our API token. The API token can be created by going to My Profile->API Tokens and creating a token with the Edit DNS permission on the DNS zones for which you wish to request certificates. In the cloudflare.ini comment out the dns_cloudflare_email and dns_cloudflare_api_key values, then uncomment dns_cloudflare_api_token and add your API token against it.
Once we enter the credentials into the ini file, we'll restart the docker container via docker restart swag and again watch the logs. After successful validation, our webserver should be up and accessible by visiting your domain name.
Now we will need to setup the reverse proxy configuration via SWAG. Where you are storing SWAG's config data /path/to/appdata/config/ find /nginx/proxy-confs and create a new file called bluesky.subdomain.conf
server {
    listen 443 ssl http2;
    listen [::]:443 ssl http2;

	server_name bluesky.*;
	server_name *.bluesky.yourdomain.com;

    include /config/nginx/ssl.conf;

    client_max_body_size 0;
    proxy_redirect off;
    proxy_buffering off;

    location / {
        include /config/nginx/proxy.conf;
        include /config/nginx/resolver.conf;
        set $upstream_app pds;
        set $upstream_port 3000;
        set $upstream_proto http;
        proxy_pass $upstream_proto://$upstream_app:$upstream_port;
    }
}
Then run docker restart swag and verify that there are no errors.
Bluesky PDS
This next part will cover the Bluesky PDS container and initial setup
In your docker-compose.yml add the following
  pds:
    container_name: pds
    image: ghcr.io/bluesky-social/pds:0.4
    restart: unless-stopped
    ports:
      - 3000:3000
    volumes:
        - path/to/pds/storage:/pds
    env_file:
      - /path/to/pds.env
You will need to decide where you want to store the PDS data as well as where you want to store a pds.env file to be used by the container.
In the pds.env file please enter and edit the following. # denotes a comment, or command, to help fill out this file. Your data should be directly following the =. Delete the comment after completion
PDS_HOSTNAME= #bluesky.yourdomain.com
PDS_JWT_SECRET= #openssl rand --hex 16
PDS_ADMIN_PASSWORD= #openssl rand --hex 16
PDS_PLC_ROTATION_KEY_K256_PRIVATE_KEY_HEX= #openssl ecparam --name secp256k1 --genkey --noout --outform DER | tail --bytes=+8 | head --bytes=32 | xxd --plain --cols 32
PDS_EMAIL_SMTP_URL= #smtp://[email protected]:[email protected]:587
PDS_EMAIL_FROM_ADDRESS= #[email protected]
PDS_MODERATION_EMAIL_SMTP_URL= #smtp://[email protected]:[email protected]:587
PDS_MODERATION_EMAIL_ADDRESS= #[email protected]
PDS_DATA_DIRECTORY=/pds
PDS_BLOBSTORE_DISK_LOCATION=/pds/blocks
PDS_DID_PLC_URL=https://plc.directory
PDS_BSKY_APP_VIEW_URL=https://api.bsky.app
PDS_BSKY_APP_VIEW_DID=did:web:api.bsky.app
PDS_REPORT_SERVICE_URL=https://mod.bsky.app
PDS_REPORT_SERVICE_DID=did:plc:ar7c4by46qjdydhdevvrndac
PDS_CRAWLERS=https://bsky.network
LOG_ENABLED=true
Then we'll fire up the new container via docker compose -f <path/to/your/docker-compose.yml> up -d
If you did everything correctly you should be able to load https://bluesky.yourdomain.com/xrpc/_health and see something like {"version":"0.4.12"}
Joining the network
Initially to join the network you'll need to join the AT Protocol PDS Admins Discord and register the hostname of your PDS. They recommend doing so before bringing your PDS online. In the future, this registration check will not be required.
Create an invite code
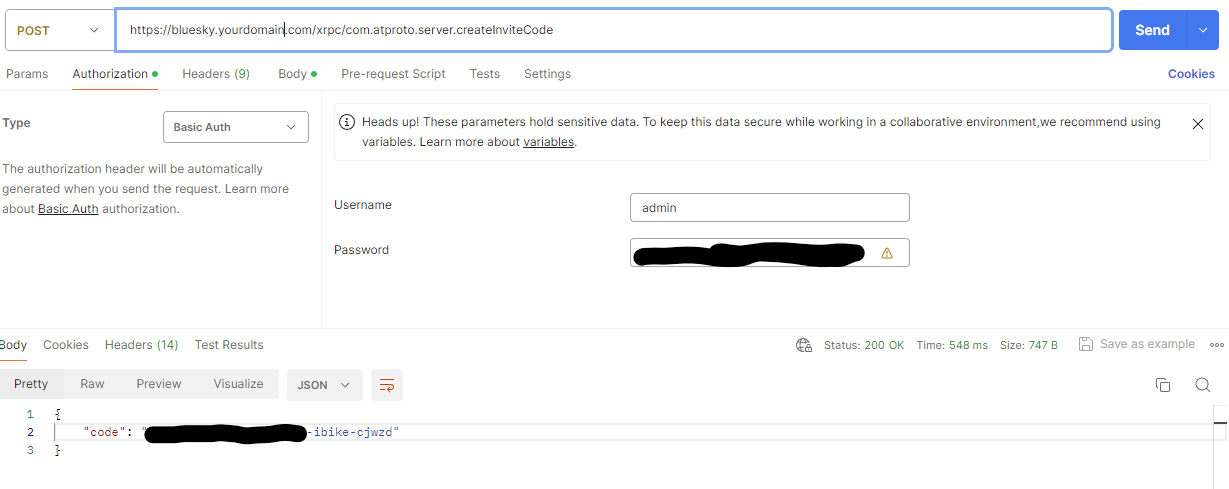
You will need Postman or something similar for this step since we will be sending calls to our server's API endpoints.
Setup a POST request to https://bluesky.yourdomain.com/xrpc/com.atproto.server.createInviteCode
Under Authorization use Basic Auth. Username admin, Password is the PDS_ADMIN_PASSWORD from the pds.env file.
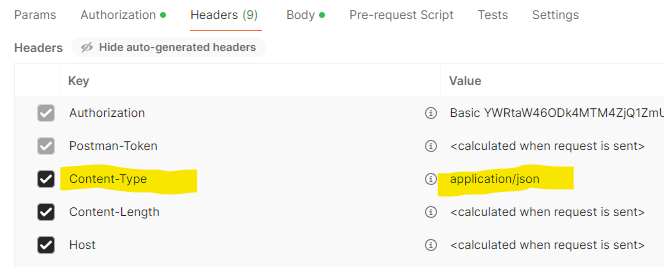
Under Headers add a header called Content-Type with the value application/json
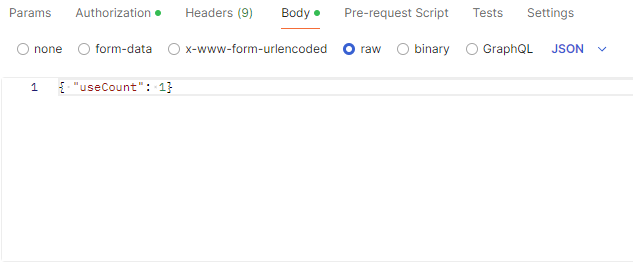
Under Body user the raw data type with the JSON format option and enter the following into the body field {"useCount": 1}
Click Send and you should get your invite code as the response.
Registering
Now you should be able to register your account. Go to bsky.app and click Sign up
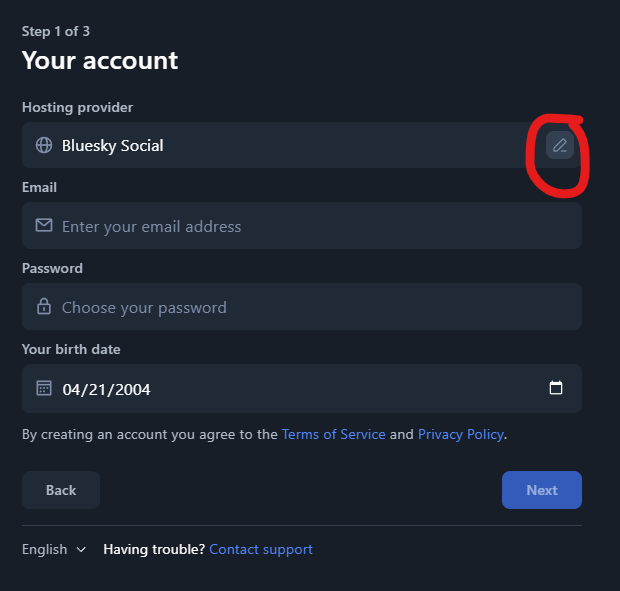
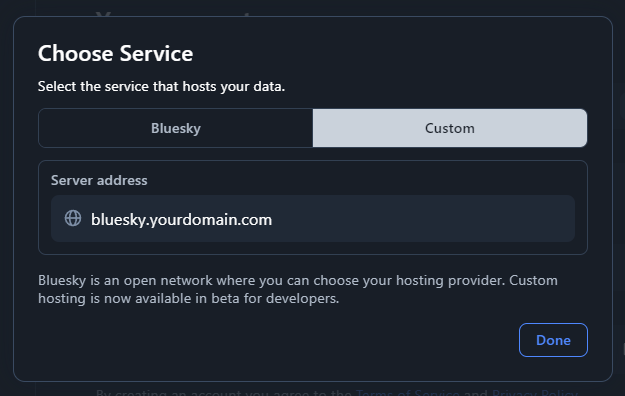
Click Done, enter your invite code and fill out the rest of the form
lastly you will need to add one last DNS record to cloudflare. In the Bsky.app app or website, go to Settings > Advanced > Change Handle
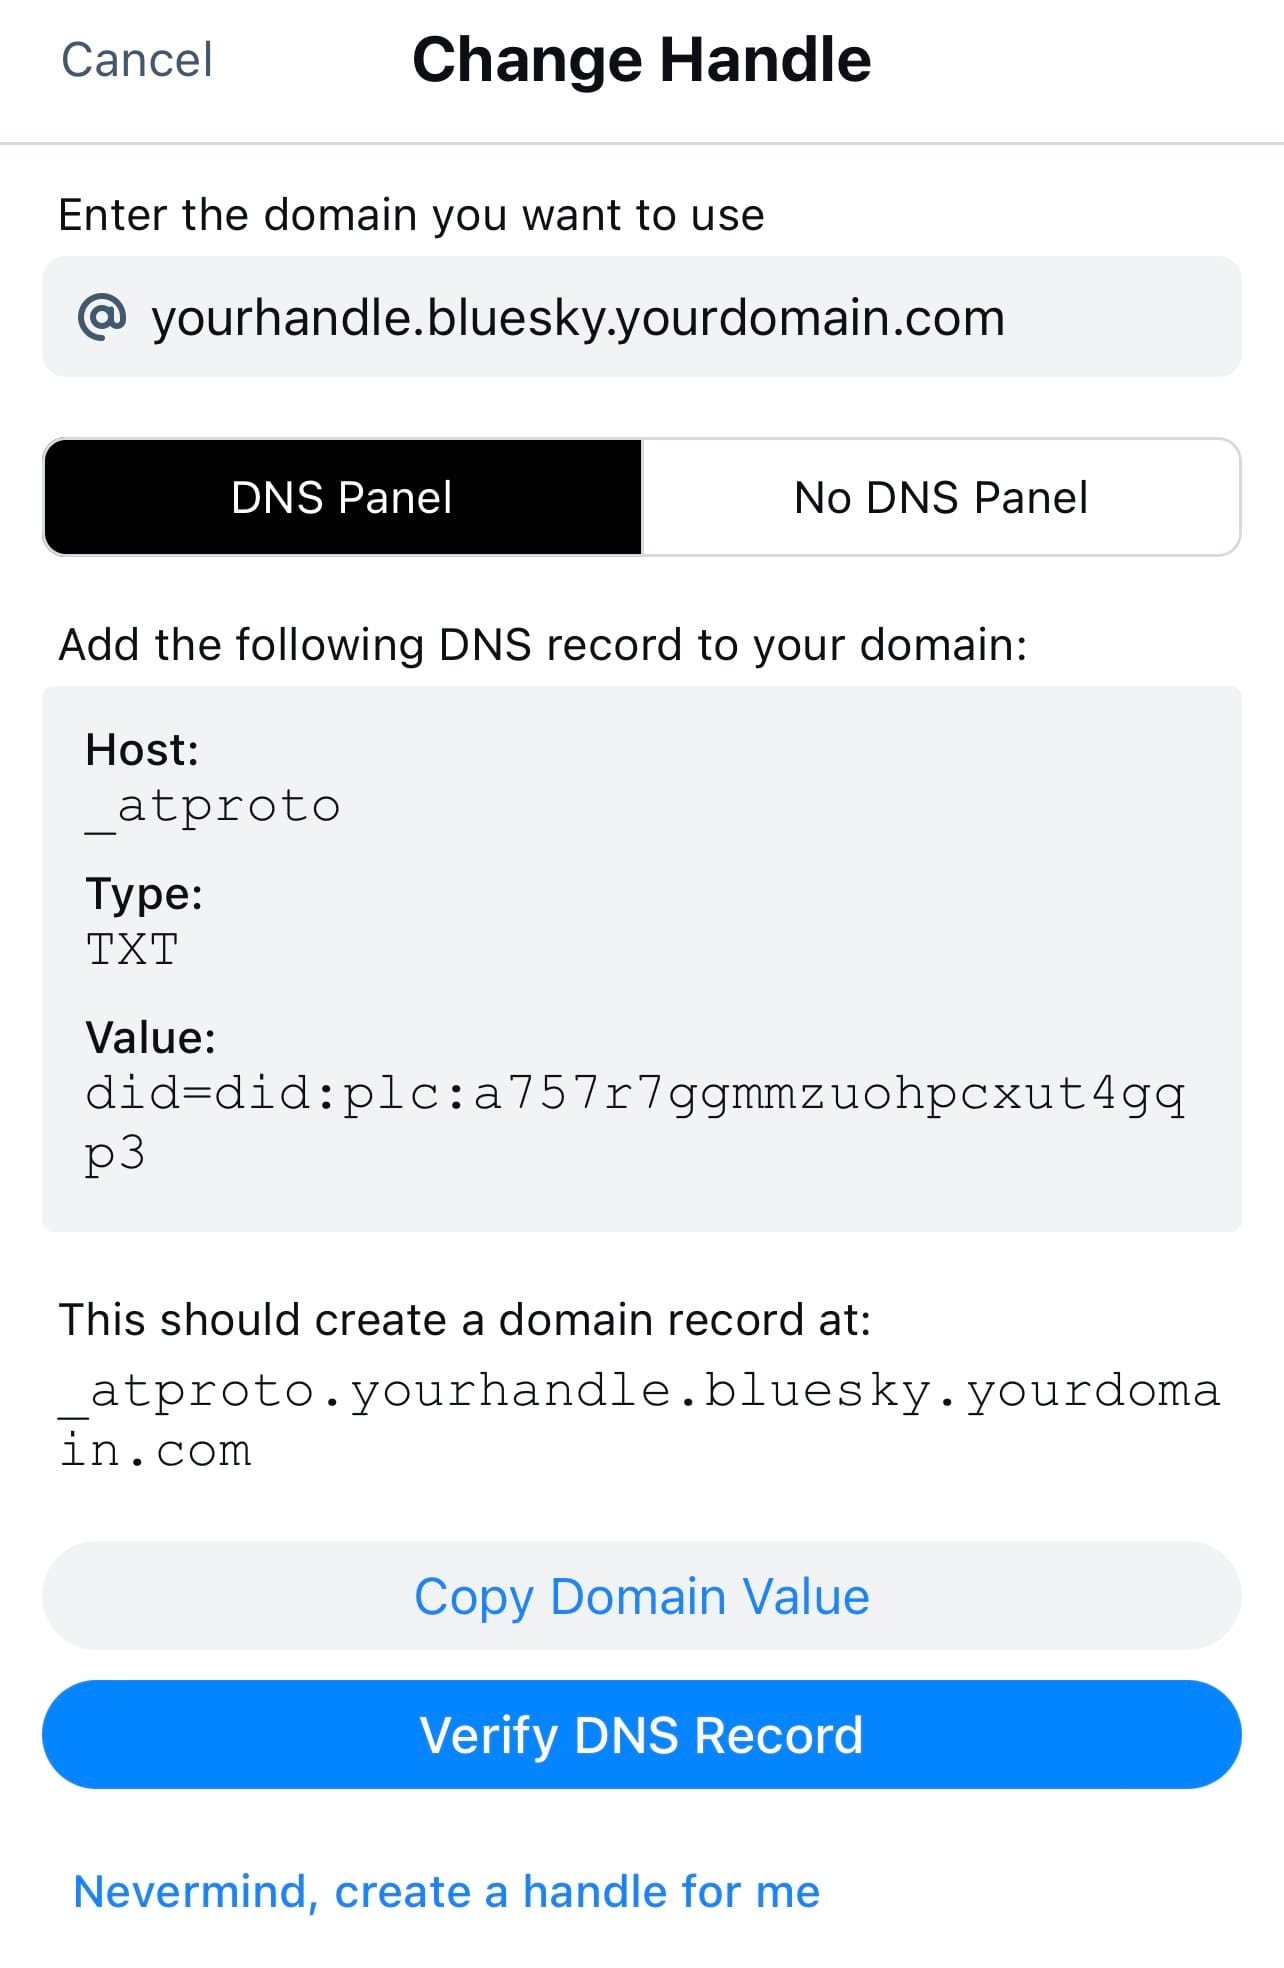
Add your specific values to your Cloudflare DNS, then validate using the Bsky debug website and you should be set!
If you still see “Invalid Handle” and it’s passing the DNS check, just change your handle to what it already is to revalidate.